Homemade Cheesy Breadsticks are a delightful snack that can elevate any meal or stand alone as an irresistible treat. These cheesy delights are warm, buttery, and bursting with flavor, making them a fantastic addition to family dinners, parties, or even movie nights. With a perfect blend of seasoning and cheese, each bite is a cheesy experience that keeps you coming back for more!
If you’ve ever bitten into a warm, gooey breadstick, you’ll know how comforting it can be. The aroma alone fills the room and lifts spirits. Whether enjoyed on their own or paired with your favorite dipping sauces, these breadsticks are designed to be loved by everyone. Today, we’ll explore why this recipe stands out, the straightforward preparation involved, and all the tips you’ll need for serving them perfectly.
The beauty of Homemade Cheesy Breadsticks lies in their simplicity and versatility. You can easily adjust the recipe to incorporate your favorite cheeses or herbs, making them completely tailored to your taste. So, let’s dive into what makes this recipe amazing and why it deserves a spot in your kitchen.
Why You’ll Love This Recipe
There are numerous reasons why Homemade Cheesy Breadsticks will quickly become a favorite in your home. Here are some highlights:
1. Easy to Make: This recipe is accessible, even for novice cooks. The steps are straightforward, making it easy to whip up a batch.
2. Minimal Ingredients: Most ingredients for this cheesy delight are staples found in any kitchen. You’ll likely only need cheese, flour, butter, and seasonings.
3. Versatile Options: You can mix and match different kinds of cheese, from mozzarella to Parmesan, allowing for unique flavor profiles each time you make them.
4. Perfect for Sharing: Whether hosting a gathering or enjoying a family meal, these breadsticks are great for sharing (or hoarding!).
5. Satisfying Texture: The combination of a soft interior and a slightly crispy exterior creates a satisfying texture that makes them addictive.
6. Great for Pairing: They pair wonderfully with marinara sauce, garlic butter, ranch dressing, or even a fresh salad.
With these reasons in mind, you can see why Homemade Cheesy Breadsticks are more than just a snack; they’re a comforting experience that brings people together.
Preparation and Cooking Time
Preparing Homemade Cheesy Breadsticks requires a little under 1 hour. Here’s a breakdown of the time you’ll need:
– Preparation Time: 20 minutes
– Cooking Time: 15-20 minutes
– Total Time: Approximately 35-40 minutes
These time frames can fluctuate depending on your kitchen experience and any variations you may choose to incorporate, but they provide a good estimate for planning your snack time.
Ingredients
– 2 cups all-purpose flour
– 1 tablespoon baking powder
– ½ teaspoon salt
– 1 teaspoon garlic powder
– 1 cup shredded mozzarella cheese
– 1 cup shredded cheddar cheese
– 1 cup milk
– ¼ cup unsalted butter, melted
– 1 tablespoon dried parsley (optional)
– Additional cheese for topping (optional)
Step-by-Step Instructions
Follow these easy steps to create your very own Homemade Cheesy Breadsticks:
1. Preheat Your Oven: Begin by preheating your oven to 425°F (220°C). This ensures your breadsticks bake evenly and achieve that perfect golden-brown color.
2. Mix Dry Ingredients: In a large mixing bowl, whisk together the all-purpose flour, baking powder, salt, and garlic powder until well combined.
3. Add Cheese: Stir in the shredded mozzarella and cheddar cheese into the dry mixture, ensuring the cheeses are evenly distributed.
4. Combine Wet Ingredients: In a separate bowl, combine the milk and melted butter. Mix well.
5. Combine Mixtures: Pour the wet ingredients into the dry mixture. Stir continuously until a soft dough forms. Avoid overmixing as it can make the breadsticks tough.
6. Knead the Dough: Turn the dough onto a lightly floured surface and knead it gently for about 1-2 minutes until it comes together smoothly.
7. Shape the Breadsticks: Roll the dough into a rectangle about ½ inch thick. Then, cut it into strips that resemble breadsticks.
8. Place on a Baking Sheet: Transfer the cut strips onto an ungreased baking sheet, spacing them a little apart.
9. Add Toppings: If desired, sprinkle additional cheese and dried parsley on top of the breadsticks for extra flavor.
10. Bake: Place the baking sheet in the preheated oven and bake for 15-20 minutes, or until the breadsticks are golden brown and the cheese is bubbling.
11. Cool and Serve: Once baked, remove the breadsticks from the oven and allow them to cool for a few minutes before serving.
These easy steps ensure you’ll end up with cheesy, warm delights that are sure to impress your family and guests.
How to Serve
To make the most of Homemade Cheesy Breadsticks, consider these serving tips:
1. Presentation: Serve warm on a decorative platter or basket lined with a cloth for a rustic look.
2. Dipping Sauces: Offer a selection of dipping sauces, such as marinara, garlic butter, or ranch dressing, to enhance flavors.
3. Pair with Meals: These breadsticks make fantastic sides for soups, salads, or pizzas, adding a comforting touch to any meal.
4. Garnish: A sprinkle of fresh parsley or grated Parmesan cheese on top before serving adds a burst of color and extra flavor.
5. Serving Size: Be generous! Cut the breadsticks into ample portions, encouraging your guests to go back for seconds.
By thoughtfully considering how to serve these Homemade Cheesy Breadsticks, you’ll elevate the dining experience and leave a lasting impression on everyone. Enjoy!
Additional Tips
– Use Fresh Ingredients: For the best outcome, always opt for fresh herbs and quality cheeses. Freshness enhances the flavor of your Homemade Cheesy Breadsticks.
– Experiment with Seasonings: Beyond garlic powder, try adding Italian seasoning, crushed red pepper, or even smoked paprika for a unique twist.
– Check for Doneness: Ovens may vary, so keep an eye on your breadsticks. They’re ready when they are a beautiful golden brown and the cheese is bubbling.
– Maintain Even Thickness: When rolling out the dough, strive for uniform thickness. This ensures even baking and consistency in texture.
– Try Different Dipping Sauces: While marinara and garlic butter are classic choices, consider trying honey mustard or a spicy sriracha mayonnaise for a new flavor experience.
Recipe Variation
Get creative in the kitchen with these variations on the classic recipe:
1. Herbed Breadsticks: Add a mix of Italian herbs into the dough for a fragrant twist. Oregano, thyme, or basil would work wonderfully.
2. Cheese Galore: Use a mix of your favorite cheeses. Gouda or pepper jack can provide a different flavor profile.
3. Spicy Kick: Incorporate finely chopped jalapeños or sprinkle crushed red pepper flakes on top for a spicy version of your Homemade Cheesy Breadsticks.
4. Stuffed Breadsticks: For an extra indulgent treat, fill your breadsticks with cheese or pepperoni before baking. This creates a gooey, delightful center.
5. Sweet Garlic Breadsticks: After baking, brush with a mix of melted butter and sugar to create a sweet garlic breadstick. Perfect for pairing with a sweeter marinara sauce.
Freezing and Storage
– Storage: Keep your Homemade Cheesy Breadsticks in an airtight container. They will stay fresh for 2-3 days at room temperature.
– Freezing: To freeze, allow the breadsticks to cool completely. Wrap them tightly in plastic wrap and then foil to prevent freezer burn. They will last in the freezer for up to 3 months.
– Reheating: When ready to enjoy, thaw in the refrigerator overnight. Reheat in a preheated oven at 350°F (175°C) for about 10 minutes to restore their softness and warmth.
Special Equipment
Good tools can make all the difference. Here’s what you’ll need to whip up your Homemade Cheesy Breadsticks:
– Mixing Bowls: A set of various sizes for mixing dry and wet ingredients separately.
– Rolling Pin: To ensure your dough is evenly flattened.
– Baking Sheet: Use heavy-duty baking sheets for even cooking.
– Parchment Paper (optional): For easier cleanup and to prevent sticking.
– Measuring Cups and Spoons: For accurate ingredient measurements.
Frequently Asked Questions
Can I use whole wheat flour instead of all-purpose flour?
Yes, whole wheat flour can be substituted, but it may change the texture slightly. You might want to compensate by adding a bit more liquid.
What can I use instead of milk?
You can use almond milk, soy milk, or even yogurt diluted with water as a substitute for milk.
Are Homemade Cheesy Breadsticks suitable for freezing?
Absolutely! They freeze well and can be reheated later without loss of quality.
How do I make them healthier?
Consider using low-fat cheese and incorporating whole grain flour to increase the nutritional value.
Can I make the dough ahead of time?
Yes, you can prepare the dough in advance. Wrap it tightly and store it in the refrigerator for up to 24 hours before baking.
Conclusion
Homemade Cheesy Breadsticks are the perfect crowd-pleaser that combines simplicity and deliciousness in every bite. With their warm, gooey texture and delightful flavors, they are ideal for any occasion. Whether you are enjoying them at dinner with family or serving them at a party, these breadsticks are sure to impress. Don’t hesitate to tweak the recipe to suit your preferences, and most importantly, have fun with the process!
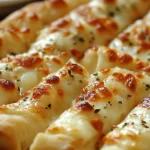
Homemade Cheesy Breadsticks: An Amazing Ultimate Recipe
- Total Time: 33 minute
Ingredients
– 2 cups all-purpose flour
– 1 tablespoon baking powder
– ½ teaspoon salt
– 1 teaspoon garlic powder
– 1 cup shredded mozzarella cheese
– 1 cup shredded cheddar cheese
– 1 cup milk
– ¼ cup unsalted butter, melted
– 1 tablespoon dried parsley (optional)
– Additional cheese for topping (optional)
Instructions
Follow these easy steps to create your very own Homemade Cheesy Breadsticks:
1. Preheat Your Oven: Begin by preheating your oven to 425°F (220°C). This ensures your breadsticks bake evenly and achieve that perfect golden-brown color.
2. Mix Dry Ingredients: In a large mixing bowl, whisk together the all-purpose flour, baking powder, salt, and garlic powder until well combined.
3. Add Cheese: Stir in the shredded mozzarella and cheddar cheese into the dry mixture, ensuring the cheeses are evenly distributed.
4. Combine Wet Ingredients: In a separate bowl, combine the milk and melted butter. Mix well.
5. Combine Mixtures: Pour the wet ingredients into the dry mixture. Stir continuously until a soft dough forms. Avoid overmixing as it can make the breadsticks tough.
6. Knead the Dough: Turn the dough onto a lightly floured surface and knead it gently for about 1-2 minutes until it comes together smoothly.
7. Shape the Breadsticks: Roll the dough into a rectangle about ½ inch thick. Then, cut it into strips that resemble breadsticks.
8. Place on a Baking Sheet: Transfer the cut strips onto an ungreased baking sheet, spacing them a little apart.
9. Add Toppings: If desired, sprinkle additional cheese and dried parsley on top of the breadsticks for extra flavor.
10. Bake: Place the baking sheet in the preheated oven and bake for 15-20 minutes, or until the breadsticks are golden brown and the cheese is bubbling.
11. Cool and Serve: Once baked, remove the breadsticks from the oven and allow them to cool for a few minutes before serving.
These easy steps ensure you’ll end up with cheesy, warm delights that are sure to impress your family and guests.
- Prep Time: 15 minutes
- Cook Time: 15-20 minutes
Nutrition
- Serving Size: 8 breadsticks
- Calories: 250 kcal
- Fat: 10g
- Protein: 10g