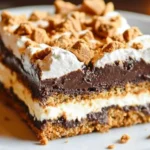
S’more Bars are a delightful twist on the classic camping treat, bringing together the flavors of chocolate, marshmallows, and graham crackers into a handheld, easy-to-eat dessert. These bars encapsulate the wonderful essence of a campfire evening, allowing you to enjoy the deliciousness of S’mores without the hassle of an open flame. The combination of textures—crunchy, gooey, and chocolatey—creates an indulgent experience that everyone will love.
Have you ever craved the taste of S’mores but found yourself without a fire or the outdoor setting? With these S’more Bars, you can enjoy those familiar flavors anytime, anywhere. The sweet aroma wafting through your kitchen as these bars bake will transport you straight to summer campfires, evoking memories of laughter and warmth.
Packed with flavor and incredibly simple to make, this recipe is perfect for gatherings, parties, or just a cozy night in. Whether you’re indulging on your own or sharing them with friends and family, these S’more Bars promise to impress. Each bite offers a wonderful balance of sweetness and rich chocolate, making them a must-try dessert for any occasion.
Let’s explore why this specific recipe for S’more Bars stands out, how to prepare them, and tips for serving these amazing treats!
Why You’ll Love This Recipe
There are countless reasons you’ll adore this S’more Bars recipe. Here are a few key highlights:
1. Easy to Make: The simplicity of this recipe ensures that bakers of all skill levels can whip up these bars without any fuss.
2. Minimal Ingredients: With only 10 simple ingredients, you likely have most of them at home already.
3. Versatile Options: Feel free to modify ingredients according to your taste. You can use different types of chocolate or even add nuts for an extra crunch.
4. Portable Treat: Unlike traditional S’mores, these bars are easy to pack up and take on the go, making them perfect for picnics or road trips.
5. Time-efficient: These bars can be made in under an hour, giving you a quick dessert option without sacrificing flavor.
6. Crowd Pleaser: Whether it’s a birthday party, barbecue, or family gathering, these bars are sure to be a hit and are loved by kids and adults alike.
7. Deliciously Decadent: The layers of chocolate and gooey marshmallows create an irresistible combination, leaving everyone wanting seconds.
With these enticing qualities, it’s clear why this S’more Bars recipe is regarded as a classic. Get ready to dive deep into the preparation!
Preparation and Cooking Time
Preparing S’more Bars is both quick and fun. Here’s a straightforward breakdown of the time involved:
– Preparation Time: 15 minutes
– Cooking Time: 25 to 30 minutes
– Cooling Time: 10 to 15 minutes
In total, you will be looking at about 1 hour from start to finish. This makes it an excellent option when you’re short on time but still want to create something special.
Ingredients
– 1 ½ cups graham cracker crumbs
– ½ cup unsweetened cocoa powder
– ¾ cup granulated sugar
– ½ cup melted butter
– 1 ½ cups semi-sweet chocolate chips
– 2 cups mini marshmallows
– 1 teaspoon vanilla extract
– ¼ teaspoon salt
– Optional: ½ cup chopped nuts (e.g., walnuts or pecans)
– Sprinkles of sea salt (for garnish)
Step-by-Step Instructions
Creating these delicious S’more Bars is a straightforward process. Follow these easy steps to make your own:
1. Preheat the Oven: Begin by preheating your oven to 350°F (175°C) and greasing a 9×9 inch baking dish or lining it with parchment paper for easy removal.
2. Make the Crust: In a medium bowl, combine graham cracker crumbs, cocoa powder, and sugar. Pour in the melted butter and mix until well combined. The mixture should look like wet sand.
3. Press the Mixture: Firmly press the graham cracker mixture into the bottom of the prepared baking dish. Ensure it’s packed evenly to create a solid base.
4. Layer the Chocolate Chips: Sprinkle the semi-sweet chocolate chips evenly over the graham cracker crust.
5. Add the Marshmallows: Evenly distribute the mini marshmallows on top of the chocolate layer. This will give your bars that signature gooey texture.
6. Bake: Place the baking dish in the preheated oven and bake for 25 to 30 minutes, or until the marshmallows are golden and bubbly.
7. Cool the Bars: Once done, remove the baking dish from the oven and allow it to cool for 10 to 15 minutes. This cooling period is vital for cutting the bars into neat squares.
8. Cut and Serve: Once cooled, use a sharp knife to carefully cut the bars into squares. Optionally, you can sprinkle a little sea salt on top for an added flavor dimension.
These straightforward instructions will have you in dessert heaven in no time!
How to Serve
To enhance your S’more Bars experience, consider these serving suggestions:
1. Presentation: Place the bars on a decorative platter or cake stand. A clean, attractive presentation always elevates the dessert experience.
2. Accompaniments: Serve with a scoop of vanilla ice cream or whipped cream on the side. The coolness of ice cream nicely contrasts with the warmth of the freshly baked bars.
3. Garnishes: Drizzle extra melted chocolate over the bars or use caramel sauce for a decadent touch.
4. Beverage Pairings: These bars pair wonderfully with milk, coffee, or even a light dessert wine, enhancing the overall tasting experience.
5. Store Properly: If you have leftovers, store them in an airtight container at room temperature. They can also be individually wrapped for easy, on-the-go treats.
Serving these S’more Bars thoughtfully ensures that your guests will remember them long after the last bite. By putting a little extra care into presentation and accompaniments, you elevate this already incredible dessert into something truly special!
Additional Tips
– Use Quality Chocolate: Opt for high-quality semi-sweet chocolate chips for a rich taste.
– Adjust Marshmallow Amount: If you prefer gooey bars, feel free to increase the mini marshmallows to suit your preferences.
– Let them Rest: Allow the bars to cool completely before cutting to ensure cleaner edges and easier handling.
– Add Flavor: Consider flavoring the butter with a bit of almond extract for a unique twist.
Recipe Variation
There are countless ways to customize and enhance your S’more Bars. Here are a few creative ideas:
1. Peanut Butter S’mores: Swirl in some peanut butter between the layers for a delicious nutty flavor.
2. Vegan Version: Substitute butter with coconut oil or vegan butter and use dairy-free chocolate chips.
3. Flavored Crust: Use chocolate graham crackers for a more intense chocolate flavor in your crust.
4. Fruit Infusion: Layer in some sliced strawberries or bananas for a fruity take on this classic treat.
Freezing and Storage
– Storage: Keep your S’more Bars in an airtight container at room temperature for up to a week. They remain delicious and chewy.
– Freezing: If you want to extend their life, you can freeze the bars. Wrap them individually in plastic wrap and store in a freezer-safe container for up to three months.
Special Equipment
To prepare your S’more Bars efficiently, gather the following equipment:
– 9×9 inch baking dish: This is essential for even baking and easy storage.
– Medium mixing bowls: You’ll need these for combining the crust and filling ingredients.
– Parchment paper: An optional but handy tool for easy removal of the bars from the baking dish.
– Sharp knife: A good knife ensures clean cuts for serving.
Frequently Asked Questions
Can I use a different size baking dish?
Yes, larger or smaller dishes can be used, but adjust the baking time accordingly. A larger dish may result in thinner bars that cook faster.
How do I know when the bars are done?
Check for bubbly, golden marshmallows and a solid crust as indicators that they are fully cooked.
Can these bars be made nut-free?
Absolutely! You can omit the nuts or replace them with more graham cracker crumbs for extra texture.
What can I pair with S’more Bars for a dessert table?
Pair with other desserts like brownies or a fruit salad. The combination of flavors will complement each other well.
Conclusion
S’more Bars are a delightful, easy-to-make dessert that captures the essence of a campfire treat. With their gooey marshmallows, rich chocolate, and crunchy graham cracker base, these bars are sure to be a crowd-pleaser. Whether you’re hosting a gathering or just treating yourself, this recipe is versatile and perfect for any occasion. Enjoy your homemade S’more Bars with friends and family for an unforgettable dessert experience!
S’more Bars: An Amazing Ultimate Recipe Made with 10 Ingredients
- Total Time: 22 minute
Ingredients
– 1 ½ cups graham cracker crumbs
– ½ cup unsweetened cocoa powder
– ¾ cup granulated sugar
– ½ cup melted butter
– 1 ½ cups semi-sweet chocolate chips
– 2 cups mini marshmallows
– 1 teaspoon vanilla extract
– ¼ teaspoon salt
– Optional: ½ cup chopped nuts (e.g., walnuts or pecans)
– Sprinkles of sea salt (for garnish)
Instructions
Creating these delicious S’more Bars is a straightforward process. Follow these easy steps to make your own:
1. Preheat the Oven: Begin by preheating your oven to 350°F (175°C) and greasing a 9×9 inch baking dish or lining it with parchment paper for easy removal.
2. Make the Crust: In a medium bowl, combine graham cracker crumbs, cocoa powder, and sugar. Pour in the melted butter and mix until well combined. The mixture should look like wet sand.
3. Press the Mixture: Firmly press the graham cracker mixture into the bottom of the prepared baking dish. Ensure it’s packed evenly to create a solid base.
4. Layer the Chocolate Chips: Sprinkle the semi-sweet chocolate chips evenly over the graham cracker crust.
5. Add the Marshmallows: Evenly distribute the mini marshmallows on top of the chocolate layer. This will give your bars that signature gooey texture.
6. Bake: Place the baking dish in the preheated oven and bake for 25 to 30 minutes, or until the marshmallows are golden and bubbly.
7. Cool the Bars: Once done, remove the baking dish from the oven and allow it to cool for 10 to 15 minutes. This cooling period is vital for cutting the bars into neat squares.
8. Cut and Serve: Once cooled, use a sharp knife to carefully cut the bars into squares. Optionally, you can sprinkle a little sea salt on top for an added flavor dimension.
These straightforward instructions will have you in dessert heaven in no time!
- Prep Time: 15 minutes
- Cook Time: 25 to 30 minutes
Nutrition
- Serving Size: 9 servings
- Calories: 290 kcal
- Fat: 12g
- Protein: 3g